Showing posts with label easy. Show all posts

Wednesday, March 27, 2013

Broccoli Cheddar Pockets


I found these on a whim last week while desperately searching for something new and easy to try for dinner. We grabbed ingredients on the way home (thank you, premade bread dough), and within an hour were pulling these out of the oven. A few bites later, Dan the Man declared these broccoli-cheddar pockets had made it to his top ten list of favorite meals.

Of course if you had time you could certainly make your own dough from scratch, but I was pleased with these results. We brainstormed future fillings like pepperoni and mozzarella, ham and cheddar, or spinach and feta.

Based on a recipe from LaurasSweetSpot.com.

Ingredients (makes 8 pockets)

  • 3-4 small broccoli crowns, chopped into small pieces (about 4 cups)
  • 8 oz grated sharp cheddar cheese
  • 4 Tbsp sour cream
  • small handful fresh chives, chopped
  • Vegetable oil, for brushing (vegetable oil spray works fine too)
  • All-purpose flour, for dusting
  • 2 (11-ounce) tubes refrigerated French bread dough
  • 1 large egg
Directions
  1. Bring a saucepan of lightly salted water to a boil. Add the broccoli and cook 1 minute. Drain and rinse under cold water until cool; pat very dry. 
  2. Preheat oven to 425 degrees. Brush or spray baking sheet with vegetable oil.
  3. Mix broccoli, cheddar, sour cream, and chives in a bowl until combined. Squeeze the mixture together to compact it.
  4. Use a little bit of flour to lightly dust your work surface.
  5. Cut each tube of dough into four pieces. Roll each piece out and fill with broccoli mixture. Fold and secure each pocket, then place seam-side down on the baking sheet.(Check out these excellent step-by-step photos if you have never made these before!)
  6. Beat egg in a small bowl. Add 1 Tbsp water and mix well.
  7. Brush each pocket with egg wash. Bake until golden brown, about 15 minutes.

Tuesday, February 19, 2013

Sautéed Swiss Chard with Garlic

This recipe comes to me from my friend Vickie, who is an Italian cooking pro. (Happy birthday Vickie!) We were discussing greens such as Swiss chard, and what to do with them. Her recommendation? A simple, yet flavorful way to get a serving of veggies into your meal when you are sick of salad.

This recipe works with any type of greens, such as spinach or kale but the texture is best with Swiss chard because their large stems provide a good crunch without being too bitter.

Ingredients
• 1 bunch fresh Swiss chard (I used green chard)
• 3 Tbsp olive oil
• 3 cloves garlic, sliced thinly
• sea salt

Directions
1. Wash chard thoroughly and chop up.
2. Heat large frying pan over medium heat.
3. When pan is hot, add olive oil and garlic. Sauté for one minute, just enough for the garlic to flavor the oil.
4. Add half the chard and cook, stirring almost constantly.
5. As there is room, add another handful of chard. Keep stirring to coat new chard with oil.
6. Continue this process until all chard has been added. Stir and keep cooking until all chard has wilted and turned dark green.
7. Pour into serving dish. Season with sea salt and serve hot.


Wednesday, December 26, 2012

Greyhounds

I first enjoyed greyhounds at a friend's wedding and have been making them at home ever since. But the best version I've had yet was using freshly squeezed grapefruit juice. Thanks to Dan the Man, I have this excellent recipe to share with you. It is a great way to use up those citrus fruits sitting around your house.

Ingredients
  • ice cubes
  • 1 ripe grapefruit, juiced
  • 1-2 shots premium vodka

Directions
  1. Fill a rocks glass with ice.
  2. Add vodka and juice of one grapefruit.
  3. Stir well and serve immediately.

Monday, September 24, 2012

Sweet Potato Bread


I love dessert breads. They are a little less sugary tasting than cookies but just as satisfying to me. If you’ve tried my Honey Banana Bread, you may recognize this recipe – it is an adaptation.

For a different texture, try frying a slice of this in butter – it gets crispy and warm and delicious. It makes a great breakfast snack

Ingredients
  • 6 Tbsp (3/4 stick) salted butter, softened
  • 1 cup sugar
  • 2 eggs
  • 1 tsp vanilla
  • 2 1/2 cups grated raw sweet potato (one medium-large potato will do)
  • 2 cups flour
  • 1 tsp baking powder
  • 1 tsp baking soda
  • 2 tsp cinnamon


Directions
  1. Preheat oven to 350 degrees.
  2. Grease loaf pan well, especially the bottom. Set aside.
  3. In a large mixing bowl, cream together butter and sugar.
  4. Add eggs, vanilla, and sweet potato. Mix until incorporated.
  5. In a separate bowl, mix flour, baking powder, baking soda, and cinnamon.
  6. While stirring sweet potato mixture, slowly add flour mixture until all is incorporated.
  7. Pour batter into loan pan.
  8. Bake at 350 degrees for 55 minutes.
  9. Remove immediately from pan and let cool completely before cutting.

Monday, June 18, 2012

Texas Caviar


I brought this recipe to a recent 6th grade event where a coworker and I did a workshop on healthy snacks. This is simple for kids to make - most of the ingredients just need to be rinsed. They may need some help chopping the pepper and celery, to get the pieces small enough.

This recipe is versatile because it can be scooped up with tortilla chips, or served as a side dish with your meal.

Thanks to my friend Steph who suggested this recipe! (And yes, this is the Stephanie of Fruit Pizza fame!)


Main Ingredients
·      15 oz can black eyed peas, rinsed
·      15 oz can black beans, rinsed
·      15 oz can corn, rinsed
·      1 green pepper, diced
·      1 stalk celery, diced
Dressing Ingredients
·      3/4 cup apple cider vinegar
·      1/4 cup olive oil
·      1 cup sugar

Directions
1.    Combine main ingredients in a large bowl.
2.    In a separate bowl, combine dressing ingredients. Whisk until sugar has dissolved.
3.    Pour dressing over main ingredients. Cover and refrigerate. Let sit for at least four hours, but hopefully overnight. Drain well.
4.    When ready, serve with tortilla chips or as a side dish.

Monday, June 11, 2012

Greek Style Salad with Simple Dressing

photo by Alison Tyne
Slowly but steadily I have had a new fan every week or so on the Artistic Eatables Facebook page, even during my recent hiatus - thank you to all who have patiently waited for a new recipe!

This weekend, my friend Alison came to photograph my husband's band. After they got home, we decided on a non-traditional salad for dinner and chose to create our version of a dish from Salads by Jane Price.


INGREDIENTS (serves 3-4)
For a vegan meal, be sure to omit the cheese.
  • 1 bag baby spinach
  • 1 can artichoke hearts, drained, halved or quartered
  • 1 lemon, zest and juice
  • sundried tomatoes, cut into strips
  • kalamata olives, pitted
  • 1/2 red pepper, sliced (roasted red peppers would also be nice)
  • feta cheese (optional; parmesan is another alternative)
  • olive oil
  • freshly ground black pepper, optional

DIRECTIONS
To plate each salad:
  1. Lay down a bed of baby spinach.
  2. Arrange a few artichoke hearts, olives, and red pepper slices around the edge of the plate.
  3. Sprinkle sundried tomato strips over greens.
  4. Top with some lemon zest and feta cheese (if using).
  5. Drizzle a small amount of olive oil, then about 1/4 of the lemon juice over your salad.
  6. Top with some freshly ground black pepper, if desired, then serve.

Sunday, February 26, 2012

Chocolate Pots de Creme


As soon as I saw these on the Pioneer Woman's blog, I knew I had to try them. Besides being adorable, they are an easy dessert with no cooking involved. I adapted her recipe to make a few things easier, including the types of ingredients you might need.

I made this dish at our Valentine's Day dinner, and it was a hit but please be warned that this is very rich (as you might guess when you read the ingredients)! A little goes a long way, so you won't need much to feel satisfied.


Ingredients
  • 12 oz bag semi-sweet chocolate chips 
  • 4 eggs, at room temperature 
  • dash of salt 
  • splash of vanilla extract OR flavored liquer (such as Grand Marnier
  • 1 cup (8 oz) brewed coffee OR hot cocoa (the liquid must be HOT
  • powdered sugar or whipped cream (optional, for decoration)
Directions

  1. Place chocolate chips and 2 of the eggs in a blender. Pulse until chips are broken up.
  2. Add the other 2 eggs, salt, and vanilla / liquer. Blend until smooth.
  3. While blender is on, slowly pour a steady stream of hot cocoa / coffee into the chocolate mixture.
  4. Pour into ramekins or small Mason jars. Place in fridge and let set, about 2 hours.
  5. Before serving, decorate with a sprinkle of powdered sugar or whipped cream.

Friday, February 10, 2012

Breakfast Burrito

My husband introduced me to a great way to use leftover groceries from a Mexican meal. This is an adaptation of his official breakfast burrito. The nice thing about it is that it can include any ingredients you feel like eating in the morning. Stir fried vegetables are one great idea that I'd like to try next.

Ingredients
  • 1 egg
  • large soft tortilla
  • refried beans
  • cheddar cheese, shredded
  • toppings such as salsa, Sriracha, or sour cream

Directions
  1. Heat a frying pan over medium heat. Cook one egg to your liking. (I enjoy frying an egg in a little butter, but scrambling would work fine too.)
  2. On one half of a large tortilla, spread the desired amount of refried beans.
 3. Cover the beans with shredded cheese,
 your cooked egg,
 and the desired toppings.
 4. Heat the frying pan over medium heat. Roll up your tortilla, being careful to fold in the sides so your filling does not leak out. Cook over medium heat, rotating every 1-2 minutes, until all sides are crisp.

Thursday, January 12, 2012

Stephanie's Fruit Pizza (Dessert)


This recipe comes from one of my students who is an awesome cook. Ever since watching Jamie Oliver's video on superb salads, she has made her own salad dressings for lunch. She has tried out her own oreo truffles. Most recently, she brought this wonderful dessert to a shared meal. It was wonderful because it had a little bit of sugary sweet (from the 'crust') with the rest of the flavor from the fruit.

This dessert would work well with many kinds of fruit, as long as they are firm, like kiwi, apples, or bananas. Watery fruit such as peaches or oranges would not be good.

Ingredients
  • 1 package premade cookie dough (usually in the refrigerated section)
  • vegetable oil spray
  • one 13.5 oz tub of cream cheese fruit dip, such as T. Marzetti brand
  • 1 quart fresh strawberries, sliced
  • 1 pint fresh blueberries
  • 1 pint fresh blackberries
  • 1 pint fresh red raspberries
Directions
  1. Preheat oven according to temperature on cookie dough package.
  2. Very lightly, spray your pizza stone or cookie sheet.
  3. Roll out sugar cookie dough into one large pizza size circle.
  4. Bake according to package directions.
  5. Once cookie 'crust' is completely cool, spread most / all of the fruit dip onto your cookie.
  6. Evenly spread your fruit topping over the entire cookie.
  7. This pizza can be covered with aluminum foil and placed in the fridge to be served later in the day if needed.

Monday, January 2, 2012

Double Cheese Mini Pizzas

Happy new year, friends! We've finally finished moving into our new home and I'm welcoming the new year with some fun snacks.

These mini pizzas are a good base because they can be jazzed up with a number of toppings. I anticipate us trying some with caramelized onions, finely chopped pepperoni, or even pesto.

You'll find two variations of the recipe: one in the traditional style, and one where the bread is toasted and cold mozzarella cheese is applied afterward. Both are delicious, although the cold variation does preserve the wonderful texture of cold mozzarella.

Ingredients
  • fresh Italian bread
  • pasta sauce
  • fresh mozzarella, sliced (a 4 oz package will make one cookie sheet's worth of snacks)
  • Parmesan cheese
  • dried parsley
Directions - Hot Variation
  1. Preheat oven to 450 degrees.
  2. Cut Italian bread in half lengthwise, then slice into medium-thick pieces. Place on cookie sheet.
  3. Spoon a small amount of pasta sauce and spread evenly on the bread.
  4. Top each piece with a slice of mozzarella and a sprinkle of parmesan cheese. Finish with a pinch of parsley.
  5. Bake at 450 degrees until cheese gets nice and gooey, about 5 minutes.


Directions - Cold Variation
  1. Preheat oven to 450 degrees.
  2. Cut Italian bread in half lengthwise, then slice into medium-thick pieces. Place on cookie sheet.
  3. Spoon a small amount of pasta sauce and spread evenly on the bread.
  4. Bake at 450 degrees for 3-4 minutes, until sauce begins to dry out.
  5. Remove from oven. top with slice of cold mozzarella, sprinkle of parmesan cheese, and a pinch of parsley.

Tuesday, September 27, 2011

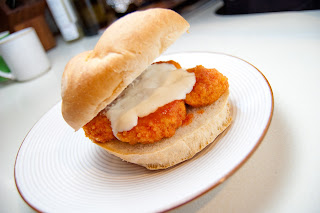
Buffalo Chicken Sandwiches

photo by Alison Tyne
I had a great time recently with my friend, the wonderful artist Alison Tyne. We spent a few days together discussing photography, businesses, and of course, food. Poor Alison had never before had a buffalo chicken sandwich! Luckily I was there to remedy the situation.

This recipe is a nice one if you are feeling lazy or just too tired to create a complex meal. It's easily adaptable for vegetarians through the use of soy chick'n nuggets (pictured).


Ingredients - per sandwich
  • 1 breaded chicken patty (or 4 soy chick'n nuggets)
  • hot sauce, such as Frank's Red Hot
  • 1 fresh sandwich roll
  • blue cheese or ranch dressing
  • 1/2 stalk celery, sliced
  • (see note below)
Directions
  1. Cook chicken patty according to package directions.
  2. Pour hot sauce into a small bowl. Dredge the patty in hot sauce and place on bun.
  3. Top with salad dressing and sprinkle with celery. Serve immediately.
Note: Norm makes a good point in the comments for those who don't like their sandwich full-strength. You can control how hot the sauce is by adding a little melted butter to your hot sauce, which will chill it out but still leave a little pizazz.

    Tuesday, September 13, 2011

    Easy Balsamic Vinaigrette

    Wow, it's been an interesting few months. In my part of New York State, we've been dealing recently with major flooding - the first day of school was cut short and the rest of the week canceled. It's been kind of unreal, to help people rip apart their houses, haul out furniture that has gone bad from being saturated with flood water, and pump out basements. Please send good thoughts to the Southern Tier as many deal with the effects of the flood.

    I am hoping to ease back into blogging with a wonderfully easy salad dressing recipe. The base of it is one I've been using for a few months, but discovered the special ingredient while watching an episode of The Pioneer Woman's show on Food Network.

    I love making my own salad dressing, and I hope you will too. Once you see how easy it is to manipulate with different flavors (such as adding in some Dijon mustard, or using a different kind of vinegar), you can have a lot of fun with it.

    Ingredients (serves 2-3)
    • 1/4 cup olive oil
    • 4 Tbsp balsamic vinegar
    • a few shakes each of salt and freshly ground pepper
    • 2 tsp brown sugar (if gluten-free, make sure to use a GF brown sugar, such as Domino brand)
    Directions
    1. Combine all ingredients in a resealable container. Shake well before serving.

      Note: Store on the shelf, not in the fridge, as olive oil will coagulate.

    Thursday, June 30, 2011

    Marinated White Beans with Tomatoes

    While preparing for a recent picnic, I decided to mix up some marinated beans. After seeing this recipe on Budget Bytes, I had been thinking about a cold bean mixture to enjoy during the hot days of summer. I adapted her idea with a few tips from Jamie Oliver's salad video to create this great snack, crostini topper, or side dish.

    Ingredients for Dressing
    • 1/4 cup olive oil
    • 2 Tbsp lemon juice
    • 1 tsp high quality mustard (ex: stone ground or Dijon mustard)
    • small handful fresh flat leaf parsley, minced
    • salt and freshly ground pepper
    Other Ingredients
    • one or two 15 oz. cans Great Northern beans, rinsed and drained (for a dish with lighter dressing, use 2 cans of beans)
    • 1 small vine ripe tomato, diced
    Directions
    1. In a small lidded container, combine dressing ingredients and shake well.
    2. In a separate bowl or container, combine beans and tomatoes. Pour dressing over top and stir until coated. 
    3. Let mixture sit at least fifteen minutes before serving atop toasted baguette slices or as a side dish.

    Sunday, May 8, 2011

    Green Beans with Simple Dressing

    When I was younger I remember not being big on vegetables. My mom was able to sneak carrots or broccoli into my repertoire only if ranch dressing was available on the side.

    My taste has matured (slightly) since then, but one thing I still love about vegetables is the crunch. These green beans are cooked, but retain their bright green color. This not only means that the nutrients are left for you to eat (rather than boiling away into the water), but also that the beans still have a bit of crunch to them.

    What I love about this recipe is how simple it is to make, yet how fancy it looks when presented.

    Ingredients
    • 2-3 large handfuls fresh green beans, ends snapped off
    • juice of 1 lemon
    • drizzle of olive oil
    • salt and freshly ground pepper
    • sliced almonds
    Directions
    1. Boil green beans until just barely cooked; beans should still be somewhat crunchy.
    2. Transfer beans to serving dish. Dress with lemon juice and olive oil, then mix just barely. 
    3. Top with salt, pepper, and almonds. Serve immediately.

    Saturday, April 16, 2011

    Polenta with Fresh Tomatoes, Basil, and Shallots

    Polenta is cooked cornmeal. Translation: a great dinner option for those who are avoiding wheat or other products with gluten.

    Polenta can be purchased pre-cooked, usually in a package whose shape resembles a giant pill. Or, you can go the old fashioned route and buy cornmeal, cooking it according to directions that are usually written on the back of the box.

    Try out this dinner meal alongside grilled chicken, or as a vegetarian option accompanied with some greens. Ours cooked up crispy on the bottom and smooth inside. You can mix it up by adding parmesan cheese to the polenta before you bake it, or changing the toppings to your liking.


    Ingredients
    • 2 cups cornmeal
    • olive oil
    • 4 plum tomatoes, chopped
    • 1/2 bunch fresh basil, roughly chopped
    • 1 large shallot, sliced (or can substitute 1 medium red onion)
    • salt and pepper

    Directions
    1. Preheat oven to 400 degrees.
    2. Cook cornmeal according to package directions. (usually a 1:1 ratio with water)
    3. Coat glass 8x8 baking dish with olive oil.
    4. Spoon cornmeal into pan and top with tomatoes, basil, and shallots.
    5. Drizzle olive oil on top of vegetables and add salt and pepper.
    6. Bake at 400 degrees for 20-30 minutes, or until shallots are tender.

      Sunday, November 28, 2010

      Spiced Oatmeal


      First off, I'd like to thank everyone who voted for me in the Manly Cupcake Challenge - I was chosen as the People's Choice! Along with two other final finalists, my recipe will be tested by the amazing bakers at C&C Cakery and a winner will be chosen. Congrats to the other finalists, whose cupcakes looked delicious!


      On to the recipe...


      This weekend I was fortunate enough to visit my favorite tea store, Sensibiliteas. The owner, Donnalynn recommended a delicious twist on traditional oatmeal, which is laid out below. The beauty is that you can cater it to your taste - want your oatmeal fruitier? Try their Peaches n' Cream spiced black tea. Are you preparing oatmeal for a traditional tea drinker? Perhaps they'd like it made with Earl Grey. The possibilities are endless.

      Oatmeal is a nutritious and very very easy to make, as long as you keep an eye on what type of oats you buy. Rolled oats (also called old-fashioned oats) are what I've used here. Steel cut oats, also delicious, would work in this recipe, just be sure to extend your cooking time since they do take a bit longer to complete. More information about oats can be found here.

      Original oatmeal recipe adapted from Mark Bittman's How to Cook Everything.

      Ingredients (makes 2 servings)
      • 2 tsp OR 2 tea bags of your favorite spiced black tea (I used Sensibiliteas' Organic Vanilla Chai)
      • 2 1/4 cups water
      • 1 cup rolled oats (NOT instant)
      • dash of salt
      • 1/3 cup of your favorite dried fruit, optional (I used raisins)
      • additional toppings, such as cream, maple syrup, brown sugar, or toasted walnuts
      Directions
      1. Boil water for tea. When water has come to a boil, measure out 2 1/4 cups into a small saucepan.
      2. Steep tea in hot water for 3-5 minutes.
      3. Remove tea bag from water. Add oats and salt. Cover and bring to a boil.
      4. When water comes to a boil, turn heat to low, add dried fruit if using, and cook, covered, for another 5-7 minutes until oatmeal is tender.
      5. Remove from heat and serve with any additional desired toppings.
      Comments

      The hardest thing about writing this entry is that there is no Scratch-n-Sniff on the internet. The smell of the oatmeal simmering in a blend of cinnamon, cardamom, vanilla, and cloves permeated the kitchen, but obviously didn't show up in the photo. If you have any interest in oatmeal, I recommend giving this a try!


      **Note: I was not compensated in any way by Sensibiliteas for this post. I am simply a fan of her products!

      Monday, June 21, 2010

      Avocado and White Bean Sandwiches

      My secret: I've been baking a loaf of bread every day this week. Out of my new cookbook, Artisan Bread in Five Minutes a Day, I've made the most beautiful baguettes without having to proof or knead the bread. 

      This recipe features two things: great bread and a great avocado. If you don't make your own bread, be sure to buy a fresh loaf the day you plan to make these.

      The recipe is inspired by this one from Real Simple.

      Ingredients (makes 2 sandwiches)
      • 15 oz. can of white kidney beans, rinsed and mashed
      • drizzle of olive oil (1-2 tsp)
      • 5-6 shakes kosher salt (less if using table salt)
      • 3-4 shakes freshly ground pepper
      • juice of 1/2 lemon (or 1-2 Tbsp lemon juice)
      • small baguette or loaf of artisan bread, sliced for sandwiches
      • mayonnaise (optional)
      • 1/3 cucumber, very thinly sliced 
      • 1/2 Hass avocado, sliced 
      • 1/4 red onion, sliced
      Directions
      1. Dump beans into flat bottomed bowl and mash using potato masher or fork. Add olive oil, salt,  pepper, and lemon juice and mix well.
      2. If using, spread mayo onto one piece of baguette/bread. Spoon bean mixture onto other piece of bread and smooth down.
      3. Top with cucumber, avocado, and onion. Add a shake of salt or pepper and enjoy!
      Comments
      Because of my avocado allergy, I had a much different sandwich. Mine consisted of the bean mixture with cucumber and onion, sans mayo, and I found it quite delicious. However, Dan insisted his tasted better, noting that the red onion flavor came through really well and the cucumber added a nice crunch.  I think white kidney beans were the best for this meal, although it would be interesting to try with white navy beans.

      Wednesday, May 26, 2010

      Chickpea and Pita

      Imagine one or more of the following scenarios:
      1. It is 90 degrees outside.
      2. It has been 90 degrees for several days in a row, all before the month of June has begun.
      3. The thought of turning on any part of your oven/stovetop makes your brain melt.

      What can you eat that is tasty, healthy, and (hopefully obviously) not made from opening a cardboard box?

      Answer: see below.

      Inspired by a recipe I found in Real Simple magazine a long time ago! One of my very favorites.

      Ingredients (to feed 2)
      • 14 oz. can chickpeas (garbanzo beans), rinsed
      • 1 tub hummus, any flavor
      • 1 package of pitas
      • 1 medium tomato, sliced or diced
      • 1/2 red onion, sliced
      • 1 lemon, cut into wedges
      • plain yogurt (optional)
      Directions
      1. Spread hummus onto a pita.
      2. Dress with chickpeas, tomato, and onion.
      3. Top with plain yogurt, if using, and a squirt of fresh lemon juice.

      Comments
      Alterations could be made simply by adding whatever veggies or spreads you want! You could also jazz up the plain yogurt by making it into tzatziki sauce by adding in diced cucumber and some lemon juice. Other tasty additions to the dish could include fresh flat leaf parsley, chopped up. My brother-in-law experimented by replacing the hummus on one of his pitas with tahini (sesame butter), which he enjoyed.

      Tuesday, March 30, 2010

      Brie, Pear, and Brown Sugar Crostini

      My roommate from college and I were obsessed with crostini - little snacks with a baguette slice as the base. The only requirements for toppings were taste related - something sweet paired with something salty. We called them "towers" and maybe someday we'll have a cookbook of our tower inventions! For Valentine's Day we had two different trays of crostini as appetizers and this recipe is one of them. It is comprised of two sweets (the pear and brown sugar) and one salty (a slice of soft Brie cheese).

      Bruschetta vs. crostini?
      Some people interchange the two but it is important to know the difference, especially if you are searching the internet for a certain recipe. Bruschetta is a very specific type of crostini (just as a square is a type of parallelogram - sorry, I'm a math geek!) that is comprised of a tiny toast topped with olive oil, salt, pepper, and diced tomatoes and onions. This word is often misused to describe what is actually crostini. The word crostini is Italian for tiny toasts, so the baguette could have any topping and still be a crostini.

      Ingredients (per cookie sheet)
      • 1/2 loaf baguette or other long, thin bread, sliced at a diagonal
      • 1 wedge Brie cheese, cut into small thin chunks
      • 1 pear, sliced very thinly
      • brown sugar

      Directions
      1. Preheat oven to 400 degrees.
      2. Place bread slices on a cookie sheet with sides. (The bread can be touching.)
      3. Top each slice with a piece of Brie, then a pear, and finally a sprinkle of brown sugar.
      4. Bake until brown sugar melts, about 5-7 minutes but sometimes longer.

      Comments
      These were heavenly and disappeared pretty fast! Sometimes they are good as a light dinner if you're feeling like snack-type foods for your meal.

      If you dislike brie (I'm not sure it's possible but I've heard that some people feel this way), try finding another soft cheese that is salty but still has a pretty mellow flavor.

      Saturday, March 13, 2010

      Jalapeno Lime Ginger Shrimp


      Does having ancestors from a Mediterranean country destine me for a life of obsession with oceanic life? I'd like to think so. When I was younger I was completely in love with dolphins and orcas. Now that I live nowhere near a great body of water I have moved on to smaller types of ocean life, preferably ones I can eat. Nori (Japanese seaweed used in sushi) is one. Shrimp is another.

      When cooking with seafood, I like to stick to simple flavors that will highlight the flavor of the fish. That's why this recipe on
      Worth the Whisk caught my eye. She intended her chili lime shrimp recipe as an appetizer, but I altered its contents for a couple reasons: it sounded really good as a meal(!), and where I live, I don't have access to a lot of exotic peppers.


      A note about buying shrimp
      : the number matters more than the size description. My recipe below suggests a pound of 16-20 count shrimp. The measuring system means in that one pound, there will be between 16-20 shrimp. A 51-60 count shrimp means you get more shrimp in a pound, but they will be much smaller. If you are looking for what some would describe as "colossal" shrimp, you would want a number like U12 or U10 (meaning fewer than 10 shrimp per pound). There is a great article about purchasing and cooking shrimp here. This article suggests that one pound of raw shrimp still in its shells (which is what my recipe used) is equivalent to about a half pound of shrimp once is has been shelled and cooked.

      Also, something I didn't realize for a long time: unlike most meats, raw shrimp starts out grey and becomes pink when cooked. This fact can make an important difference in your cooking time!


      Ingredients
      • olive oil
      • 2 cloves garlic, minced
      • 1 lb 16-20 ct. shrimp, shelled but tails left intact (purchased raw, with shells on)
      • 1-inch piece of fresh ginger, peeled and grated
      • half a jalapeno pepper, seeds removed and pepper minced
      • juice of one lime
      • handful of fresh cilantro, chopped (optional, but recommended)
      Directions
      1. Heat a frying pan to medium heat. Add olive oil and garlic. Cook for one minute.
      2. Add shrimp and cook for two to three minutes.
      3. When shrimp is pink on one side, stir/flip shrimp. Add ginger and jalapeno.
      4. When shrimp is fully cooked, turn off heat. Add lime juice.
      5. Plate immediately and serve with cilantro on side.
      Comments

      Dan and I had this dish with a side of rice. It was the perfect amount for two dinners. Just as importantly, it was a very easy and very enjoyable meal!


      We forgot the cilantro until halfway through our meal. It made a big difference in the flavors of the meal. Since the ginger and jalapeno can be strong flavors, the cilantro was nice to cool the mouth a little. It certainly wasn't unbearable without the cilantro though.