Showing posts with label peppers. Show all posts

Wednesday, January 2, 2013

Roasted Red Pepper and Garlic Dressing

I have been doing some creative problem solving in my kitchen recently. I loved this salad dressing that I had at a friend's house but he isn't one to work from recipes. So I did some experimenting to create my own version!

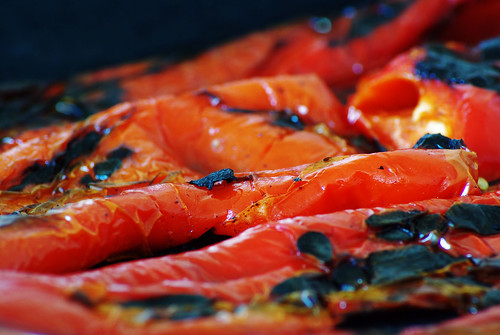
If you have never roasted peppers before, it is simple and brings out a wonderful flavor.

Ingredients
  • 2 small red bell peppers, cut in half lengthwise and seeds removed
  • 1 bulb garlic (you will use about 5 of the cloves, once they are roasted)
  • 2 Tbsp red wine vinegar
  • 1 Tbsp spicy brown (or Dijon) mustard
  • 3 Tbsp olive oil
  • 1 Tbsp plain (or vanilla) yogurt
  • salt and freshly ground pepper
Directions
  1. Preheat oven to 450 degrees.
  2. Roast the garlic. (Click here for garlic roasting directions.)
  3. Roast the peppers. (Click here for pepper roasting directions.)
  4. Combine peppers, 5 cloves of garlic, and all other ingredients in a small food processor. Blend until smooth.
  5. Serve immediately. Dressing will keep in the refrigerator for up to one week.

Monday, June 18, 2012

Texas Caviar


I brought this recipe to a recent 6th grade event where a coworker and I did a workshop on healthy snacks. This is simple for kids to make - most of the ingredients just need to be rinsed. They may need some help chopping the pepper and celery, to get the pieces small enough.

This recipe is versatile because it can be scooped up with tortilla chips, or served as a side dish with your meal.

Thanks to my friend Steph who suggested this recipe! (And yes, this is the Stephanie of Fruit Pizza fame!)


Main Ingredients
·      15 oz can black eyed peas, rinsed
·      15 oz can black beans, rinsed
·      15 oz can corn, rinsed
·      1 green pepper, diced
·      1 stalk celery, diced
Dressing Ingredients
·      3/4 cup apple cider vinegar
·      1/4 cup olive oil
·      1 cup sugar

Directions
1.    Combine main ingredients in a large bowl.
2.    In a separate bowl, combine dressing ingredients. Whisk until sugar has dissolved.
3.    Pour dressing over main ingredients. Cover and refrigerate. Let sit for at least four hours, but hopefully overnight. Drain well.
4.    When ready, serve with tortilla chips or as a side dish.

Monday, June 11, 2012

Greek Style Salad with Simple Dressing

photo by Alison Tyne
Slowly but steadily I have had a new fan every week or so on the Artistic Eatables Facebook page, even during my recent hiatus - thank you to all who have patiently waited for a new recipe!

This weekend, my friend Alison came to photograph my husband's band. After they got home, we decided on a non-traditional salad for dinner and chose to create our version of a dish from Salads by Jane Price.


INGREDIENTS (serves 3-4)
For a vegan meal, be sure to omit the cheese.
  • 1 bag baby spinach
  • 1 can artichoke hearts, drained, halved or quartered
  • 1 lemon, zest and juice
  • sundried tomatoes, cut into strips
  • kalamata olives, pitted
  • 1/2 red pepper, sliced (roasted red peppers would also be nice)
  • feta cheese (optional; parmesan is another alternative)
  • olive oil
  • freshly ground black pepper, optional

DIRECTIONS
To plate each salad:
  1. Lay down a bed of baby spinach.
  2. Arrange a few artichoke hearts, olives, and red pepper slices around the edge of the plate.
  3. Sprinkle sundried tomato strips over greens.
  4. Top with some lemon zest and feta cheese (if using).
  5. Drizzle a small amount of olive oil, then about 1/4 of the lemon juice over your salad.
  6. Top with some freshly ground black pepper, if desired, then serve.

Tuesday, January 11, 2011

Sweet & Sour Meatballs

These meatballs were a total experiment. Besides preparing them in a different kitchen, I've never made meatballs by measuring anything other than the beef and eggs. These were spiced very plainly and that's something I would change in the future: perhaps grated ginger in the meat would add a nice flavor to the mix.

My other challenge was that the sauce in this recipe didn't become, well, saucy. I always struggle with thickening sauces and this one was no different. It turned out kind of thin but still packed a great flavor. If you are good at thickening sauces, you may want to work a little more with some cornstarch to thicken this one before the last step.

This is adapted from a recipe by the Pioneer Woman.

Ingredients for Meatballs
  • 2 lbs ground beef
  • 1/2 onion, diced
  • 2 eggs
  • 1 cup breadcrumbs
  • a few shakes each of salt and pepper
  • flour
  • olive oil for frying
Ingredients for Sauce
  • 3 cups beef broth
  • 3 Tbsp soy sauce
  • 3/4 cup white wine vinegar
  • 1/2 cup sugar
  • 2 Tbsp cornstarch
  • 2 bell peppers (one green, one red),  cut into large chunks
  • 1 fresh pineapple, cut into small chunks
Directions
  1. In a large mixing bowl, combine beef, onion, eggs, breadcrumbs, and salt and pepper. 
  2. Form meat into golf ball sized meatballs.
  3. Pour some flour into a small bowl. Roll each meatball in flour.
  4. Heat large frying pan over medium-high heat. Add a generous amount of olive oil.
  5. Fry meatballs (in two batches).
  6. While meatballs are cooking, whisk broth, soy sauce, vinegar, sugar, and cornstarch in a medium-sized bowl. Set aside.
  7. Once all meatballs are done, set them aside in another bowl. Pour oil / fat out.
  8. Return hot frying pan to stovetop over high heat. Add peppers and cook for about one minute.
  9. Add pineapple and cook for another minute.
  10. Pour sauce into frying pan. Let boil, then reduce heat to low and cook for another 2-3 minutes.
  11. Add meatballs and serve immediately over rice (as a main dish) OR place meatballs in a crockpot (I used a 5-qt. crockpot) and pour pepper-pineapple-sauce mixture over top. Set heat to warm and enjoy throughout the evening as an appetizer.

Saturday, November 20, 2010

Cream Cheese Stuffed Jalapeños

It can be easy to fall into a routine at Thanksgiving - turkey, stuffing, mashed potatoes, corn, rolls, pumpkin pie.. why not spice up your holiday? Yes, literally. Live on the edge! Consider these bad boys for a fun appetizer.

I was browsing some of my favorite blogs and came across a stuffed jalapeño recipe on The Way the Cookie Crumbles. While her peppers were wrapped in prosciutto which gave them an added texture, I was hoping to focus on flavors. With the help of my awesome friend Jen, we did an experiment with several different flavor combinations and came up with the beauties you see here. I have always enjoyed cream cheese and jelly together and was glad to see it worked out in this form. We liked the combination of spicy, creamy, and sweet.

Some of the intensity does get baked out of the peppers, but they are spicy to work with in their raw state. You can throw on a pair of rubber gloves while you're slicing and seeding to keep your hands protected.


Ingredients
(This recipe is listed as gluten-free since most cream cheeses are naturally gluten-free. However, please check the label if you are unsure.)
  • 8 jalapeño peppers, halved lengthwise and seeds removed
  • about 4 oz. cream cheese or Neufchâtel cheese (half package)
  • grape jelly
Directions
  1. Preheat oven to 400 degrees.
  2. Place jalapeno halves on cookie sheet. Spread cream cheese into each the "cup" of each pepper.
  3. Bake at 400 degrees for 15-20 minutes, removing when cream cheese has browned.
  4. Top each with a small blob of jelly.
  5. Place on a nice tray to serve or eat hot off the cookie sheet.  :)

Monday, March 15, 2010

Pepperoni Pasta


Pepperoni pasta is a great way to put a twist on the traditional pasta and marinara sauce type dinner. As for cut pasta, rigatoni is what I used this time but penne, ziti, and farfalle all make good replacements in this meal.

Dan the Man''s tip for whole pepperoni - if the stick comes in its own casing, this thick wax coating is to protect the meat inside and must be peeled off before cooking. If the pepperoni comes in a plastic wrap of some sort, then the casing on the stick itself is normally a natural casing and does not need to be peeled.

Ingredients
  • 1 lb. cut pasta
  • 1 clove garlic
  • 1/2 onion, diced
  • big pinch of basil
  • big pinch of parsley
  • small pinch of oregano
  • 1 red and 1 yellow bell pepper, chopped (I used homemade roasted peppers)
  • 28 oz. can diced tomatoes, drained
  • 1 stick pepperoni, cut into half-moon slices
  • 1/4 - 1/2 cup Parmesan cheese (optional) **

**For a dairy-free diet, omit this ingredient.

Directions
  1. Cook pasta according to package directions.
  2. Rinse and leave pasta in colander.
  3. Return stockpot to stove top and wipe clean of water.
  4. Heat olive oil over medium-low heat.
  5. Add garlic, onion, basil, parsley, and oregano. Cook until onion softens.
  6. If using raw peppers, add them now and cook until softened.
  7. Add tomatoes. Cook for 2-3 minutes.
  8. Add pepperoni. If using roasted peppers, add them now too. Cook until the mixture is heated through. You will hear the liquid begin to bubble. Turn off heat.
  9. Add pasta back into stockpot. Stir well.
  10. If using Parmesan cheese, add and stir. Enjoy!


Comments
This recipe makes enough for 4-5 servings. It's one of our favorites for leftovers since it keeps so well overnight. By using the spices and onion to flavor the oil, you eliminate the need for a fancy sauce; the diced tomatoes work perfectly.

Sunday, January 31, 2010

Roasted Red Pepper Soup


During college, my friend and I loved to visit a local bistro for their Roasted Red Pepper and Gouda Bisque. We were slightly appalled to find out it came prepackaged, and were determined to someday recreate it in our own kitchens. While this version doesn’t involve gouda, it is very creamy and surprisingly filling. It also provides another use for the Roasted Red Peppers in my previous entry.


Most creamy soups require pureeing of some sort. I use an immersion blender (sometimes called a stick blender) so I can puree right in the stockpot. This makes cleanup a lot easier, but if you don’t have an immersion blender, a regular blender will work too. Directions for both pureeing methods are listed.


As I’m sure you might guess, there is a reason why I recommend removing the bay leaves before blending the soup. My first try with this recipe involved a house full of very gracious guests who were constantly picking the crunchy bay leaf pieces out of their soup, since the leaves had been chopped up by the hand blender. Since bay leaves are used in cooking for flavor only - they do not become tender during cooking like most herbs - please be nice to your guests and follow step number four!


This recipe is adapted from one I found in a Penzey’s Spices catalog, submitted by Mike Gallacher.


Ingredients

  • 6 roasted red peppers, skins removed
  • 3 Tbsp fat (I used 2 Tbsp olive oil and 1 Tbsp butter)
  • ½ large onion, minced
  • 2 generous pinches of dried whole thyme, about 1 Tbsp (less if you use ground thyme, perhaps 1 ½ tsp)
  • 4 bay leaves
  • 1 tsp garlic powder
  • 1 Tbsp dried parsley
  • Salt
  • Freshly ground pepper
  • 3 cups broth (chicken or vegetable)
  • 1 cup milk

Directions

  1. Heat the fat (butter/olive oil) over medium heat in a stockpot.
  2. Add the onion and all spices (including salt and pepper) and cook until onion is translucent.
  3. Add the broth and bring to a gentle boil. (I let the broth simmer on low until my peppers were done roasting and I had peeled the skins off, then brought the broth to a boil.)
  4. Turn heat to low. Remove ALL FOUR bay leaves.
  5. Add red peppers and use an immersion blender to puree the soup. Or, you can transfer the soup a few cups at a time to a regular blender to puree and return to stockpot.
  6. Add the milk and simmer until soup is heated throughout.

Comments

This is one of my favorite soups – it makes quite a bit, so we let the leftovers cool and freeze a few servings of it for those days when we don’t feel much like cooking. It heats back up quite well over medium heat. However, it isn’t a soup that can really stand alone as a meal; since its flavor is very strong, a coffee mug or small bowl’s worth will be plenty. It would be nice served with cheese and crackers.

Sunday, January 24, 2010

Roasting Red Peppers

image by tooeasyphotos

Roasted red peppers are considered by many to be a luxury item on their grocery list. This is probably because a small jar of roasted red peppers can cost up to $5 at some stores. However, if you can find red bell peppers at a reasonable price (at my local grocery store, they currently cost $1.99/lb, equaling about 90 cents a pepper) it is worth it to roast your own.


Why bother? Besides being cost effective (especially if you are making something that requires a lot of peppers), roasted red peppers taste a lot different when done by hand. As long as you don't rinse them when they're done, they will keep their flavor for a long time. If you plan to do a batch of them to keep for a while, you can pack them in some olive oil in a clean glass jar. When the peppers are gone, the oil will be flavored and it can be used in cooking or in any recipe that calls for olive oil, such as a pasta dish that might benefit from that extra flavor.

Roasted red peppers can be used in a green salad- one of my favorite bistros offers a salad with feta cheese, kalamata olives, roasted red peppers, and greens topped with a Greek style vinaigrette dressing. They can also be an amazing topper on a pizza (like my Mini Pizzas) or can stand alone in a dish highlighting their flavor. In the next few weeks I hope to post a recipe for Roasted Red Pepper Soup, which is great as an appetizer or paired with grilled cheese.

What You'll Need
  • red bell peppers, washed clean and stickers removed
  • large cutting board
  • kitchen knife
  • non-stick cookie sheet
  • large bowl
  • plastic/Saran wrap
Directions
  1. Preheat oven to 350 degrees.
  2. Cut peppers in half the long way. Remove stem and all seeds.
  3. Place pepper halves on cookie sheet, cut side down.
  4. Roast in oven for 20-30 minutes, more if needed. Remove when skin has blackened and is blistered all over.
  5. Immediately place peppers in large bowl and cover with plastic wrap. Wait 15-20 minutes so steam can loosen pepper skins.
  6. Peel skins from peppers. Peppers can then be sliced for immediate use, or packed in a clean glass jar and topped with oil to store in refrigerator.
Comments
The skins leave a bitter taste, so try to remove as much of them as you can. However, if they don't peel easily, you can try placing them back in the bowl, covering it, and letting the steam work its magic for a few more minutes.


See also:

Roasted Red Pepper Soup