Friday, December 31, 2010

2010 Favorites

Dear reader,

With 55 posts this year, 2010 turned out to be a very productive one. In addition to my blog's first birthday, my husband and I have enjoyed a year of healthy, delicious, homemade meals and snacks. I hope a few of them have made their way into your kitchen too. Some of my highlights are below.


Favorite Soup(s) This Year:
it is a tie between

Beef and Barley Soup
the hearty beef and barley soup, and

Roasted Red Pepper Soup
the creamy roasted red pepper soup. (Clickable link below each picture)


Most Repeated Recipe This Year, in my own kitchen:

Empanadas

empanadas, which can be filled with virtually anything and are a lot more filling than one might expect.


Favorite Dessert:

Honey Banana Bread


since I've become a fan of less intense sweetness in my desserts, this honey banana bread is still one of my most delicious memories.

What are some of your favorites from 2010? What would you like to see more of in 2011?

I hope you all have a wonderful new year!

Cheers,
Ally

Sunday, December 26, 2010

Guest Post: Baked Craisin Scones

Today's recipe comes to us from my father-in-law, The Greg. His comments (in italics):

Scones are old Scottish biscuits. The reason I make them is they're so easy and the more impatient you are with them, the better they turn out. [The idea here is that scone dough, when overworked, becomes very dense and hard to chew once cooked.] I can get up in the morning, make them, and they come out of the oven in time for me to have while I enjoy my morning coffee.

I like this recipe because you can use any flavor of dried fruit, as long as it's in small pieces. Greg has made these with regular and blueberry-flavored Craisins with great success. You could use actual dried blueberries, or even try cutting up dried apple pieces into small chunks.


Ingredients
  • 2 cups flour
  • 1/2 cup sugar
  • 2 tsp baking powder
  • 2/3 cup dried cranberries (Craisins), any flavor
  • 8 Tbsp (1 stick) cold butter, diced
  • 1 large egg
  • 2/3 cup milk

Directions
  1. Preheat oven to 425 degrees.
  2. In a large mixing bowl, mix together flour,  sugar, baking powder, and dried cranberries.
  3. Stir butter into dry ingredients and mash with potato masher (or squish with your clean fingers!).
  4. With a fork, beat eggs into milk until well stirred. Pour this into dry ingredients and mix to incorporate. Dough should be very rough (almost shredded looking), with chunks of butter still visible.
  5. Cut dough in half. Roll each half on a floured surface to about 1/2-inch thickness. Pinch edges around your circle to avoid cracks along the edges while baking.
  6. Cut each large chunk into six triangular pieces (like a pie), or use circle-shaped cookie cutter and cut out several rounds. Prick each scone with a fork.
  7. Bake on ungreased cookie sheet at 425 degrees for 10-12 minutes.

Tuesday, December 21, 2010

Party Food Ideas - 2010

While I've got a few posts about pie in the works, I know that many people are attending or hosting holiday parties this time of year. If you're like me, you're probably pulling your hair out trying to create an array of snacks that will please your guests.

Allow me to present my recommendations for your next get together.

  • For someone who's averse to processed sugars, perhaps they'd enjoy a few slices of Honey Banana Bread
Merry Christmas and Happy Holidays!

Tuesday, December 14, 2010

Nudo Italia


Looking for an awesome gift for a food lover? The Brown Eyed Baker turned me on to a great site called Nudo Italia, an Italian olive company that lets you adopt a tree. By adopting an olive tree from one of their many groves, you receive two packages: one in the spring with extra virgin olive oil pressed from the olives from your tree; and a second in the fall with three flavored olive oils, such as their chili-infused olive oil or lemon flavored olive oil.

What a wonderful way to support a small business and receive a gift that can be used year-round in the kitchen!

What are some of your favorite gifts for food lovers?

Wednesday, December 8, 2010

Beef and Barley Soup

I've been craving a beef based soup lately, and several sources have reminded me of the great combination of beef and barley. I decided to give it a whirl, following Budget Bytes' recipe most closely.

The best parts about this soup: by cooking the stew meat first, everything was flavored with its drippings; because the barley's starch began to break down and thicken the soup, no thickening agent was needed to make this almost stew-like; and finally, adding the potatoes in at the end prevented them from getting too mushy. It is an all around hearty winter soup.

Ingredients (makes 5-6 servings)
  • olive oil
  • 1 lb stew meat, cut into small pieces
  • 1 white onion, chopped
  • 3-4 cloves garlic, diced
  • 4 small stalks OR 2 large stalks celery, sliced
  • small bunch carrots, sliced
  • pinch dried thyme leaves
  • 2 bay leaves
  • 1 small package (about 10 oz) white mushrooms, sliced
  • 2 Tbsp tomato paste
  • 6 cups beef stock (I used Better Than Bouillon's beef base in 6 cups water)
  • 1 cup dried barley
  • 1 lb small red potatoes, chopped into bite size pieces
Directions
  1. Heat a small amount of olive oil in large stockpot over medium heat. Add stew meat and cook until browned. Transfer to separate bowl and set aside, leaving drippings in stockpot.
  2. Drizzle more olive oil into stockpot. Add onions and garlic and cook until onions have softened.
  3. Add celery, carrots, thyme, and bay leaves. Cook for 4-5 minutes, adding a splash of water if vegetables start to stick or burn.
  4. Add mushrooms. Continue cooking for another 3-4 minutes.
  5. Clear a little spot and add tomato paste. Cook until paste heats up, then gradually stir it into juices and vegetables.
  6. Add cooked meat back into stockpot, along with beef stock and barley. Increase heat to high and bring to a boil. Reduce heat to low and cover; simmer for 40 minutes.
  7. Add potatoes and simmer, covered, for another 10-15 minutes.

Sunday, December 5, 2010

Changing the Way You Eat

eggs from a local farm
If you're reading a food blog, you probably have some interest in the quality of your food. On the surface, this might mean that you want to make meals that taste good. You might also consider what is nutritious for you and your family. 

Does it go deeper than that? For quite some time, I have been learning more about the food industry and how it works. I am not going to gross out anyone but I will say it was very enlightening to learn about the way animals and crops are treated to get the "best" product. 

As I mentioned in my entry on food goals for 2010, one of my goals is to find local sources for more of my food. Since reading books like Animal, Vegetable, Miracle (Barbara Kingsolver) and Eating Animals (Jonathan Safran Foer) and seeing documentaries like Food, Inc., I have been working toward becoming more of a locavore - that is, eating more locally made and locally produced foods. My list below is based on my location ( Delaware / Chenango counties, southern tier of New York state)

Some changes in my food purchases:
  • eating more locally raised meats, (through farmers' markets and Chenango Bounty's website). If not locally raised, then organic, hormone-free and antibiotic-free. (My new favorite at the grocery store is Meyer's angus beef.)
  • our yogurt at home is now Chobani greek yogurt (produced in Norwich, NY without the use of rBST-treated milk) 
  • anytime we need sour cream, we buy Friendship brand, to the delight of Dan the Man (produced in Friendship, NY, near his hometown, about three hours from us)
  • our eggs now come from a local family farm (Guilford, NY) 
  • I still make my own jams - 2010 jams are blackberry and concord grape. This year both fruits were grown locally. (I picked the blackberries myself!)

As winter sets in, it can be more difficult to find local fresh produce in New York. I hope to provide more recipes using winter produce, like potatoes, winter squashes, carrots, and apples.

Have you made any changes in your food habits, whether toward becoming more of a locavore, trying to eat more meals made at home, or purchasing less junk food?

Sunday, November 28, 2010

Spiced Oatmeal


First off, I'd like to thank everyone who voted for me in the Manly Cupcake Challenge - I was chosen as the People's Choice! Along with two other final finalists, my recipe will be tested by the amazing bakers at C&C Cakery and a winner will be chosen. Congrats to the other finalists, whose cupcakes looked delicious!


On to the recipe...


This weekend I was fortunate enough to visit my favorite tea store, Sensibiliteas. The owner, Donnalynn recommended a delicious twist on traditional oatmeal, which is laid out below. The beauty is that you can cater it to your taste - want your oatmeal fruitier? Try their Peaches n' Cream spiced black tea. Are you preparing oatmeal for a traditional tea drinker? Perhaps they'd like it made with Earl Grey. The possibilities are endless.

Oatmeal is a nutritious and very very easy to make, as long as you keep an eye on what type of oats you buy. Rolled oats (also called old-fashioned oats) are what I've used here. Steel cut oats, also delicious, would work in this recipe, just be sure to extend your cooking time since they do take a bit longer to complete. More information about oats can be found here.

Original oatmeal recipe adapted from Mark Bittman's How to Cook Everything.

Ingredients (makes 2 servings)
  • 2 tsp OR 2 tea bags of your favorite spiced black tea (I used Sensibiliteas' Organic Vanilla Chai)
  • 2 1/4 cups water
  • 1 cup rolled oats (NOT instant)
  • dash of salt
  • 1/3 cup of your favorite dried fruit, optional (I used raisins)
  • additional toppings, such as cream, maple syrup, brown sugar, or toasted walnuts
Directions
  1. Boil water for tea. When water has come to a boil, measure out 2 1/4 cups into a small saucepan.
  2. Steep tea in hot water for 3-5 minutes.
  3. Remove tea bag from water. Add oats and salt. Cover and bring to a boil.
  4. When water comes to a boil, turn heat to low, add dried fruit if using, and cook, covered, for another 5-7 minutes until oatmeal is tender.
  5. Remove from heat and serve with any additional desired toppings.
Comments

The hardest thing about writing this entry is that there is no Scratch-n-Sniff on the internet. The smell of the oatmeal simmering in a blend of cinnamon, cardamom, vanilla, and cloves permeated the kitchen, but obviously didn't show up in the photo. If you have any interest in oatmeal, I recommend giving this a try!


**Note: I was not compensated in any way by Sensibiliteas for this post. I am simply a fan of her products!

Sunday, November 21, 2010

Boots and Beards: the Woodshed Prophets' Marble Swirl Cupcakes

C and C Cakery's 1st Annual Manly Cupcake Challenge


This week I've been reading about C and C Cakery's Manly Cupcake Challenge, which supports the Movember Foundation, a charity raising awareness for men's health issues.

I couldn't resist creating a cupcake especially for my favorite group of boys. The Woodshed Prophets. They're an awesome country/rock band in which my husband (Dan the Man) plays guitar, and are often the professional taste testers to many of the recipes you enjoy here on Artistic Eatables. They're some of the best guys I know, so I wanted to create a dessert that would make them proud.

They've been developing merchandise to coordinate with the release of their debut album, so I looked to the buttons, posters, and t-shirts to inspire me regarding my manly cupcakes. I also wanted something the boys would enjoy eating. Although hot dogs, beer, and pizza are all manly foods, I didn't think they'd translate well to cupcakes.

I decided to stick with black and white for the color scheme (which all began with their bootleg CD's) and chose to highlight the boot logo, which appears on their business cards and buttons. To give some variation and to honor Movember, I included some designs of beards, which is another accessory the boys seem to love. (Three of the four guys have 'em.)

As for the kitchen talk, I altered this recipe to create the cupcake batter, and the frosting recipe is direct from the Tasty Kitchen archives.

cupcakes, pre-frosting


Cupcake Ingredients (makes about 15 cupcakes)
  • 2 1/2 c. all-purpose flour
  • 1 1/3 c. sugar
  • 1 Tbsp baking powder
  • 1 c. milk
  • 1 tsp. vanilla
  • 1/2 cup (1 stick) salted butter, at room temperature
  • 2 eggs
  • 1/2 c. semi-sweet chocolate chips
  • splash of milk
Frosting Ingredients
  • 5 Tbsp flour
  • 1 cup milk
  • 1 tsp vanilla
  • 1 cup (2 sticks) butter
  • 1 cup sugar (not powdered sugar)
  • your desired color food dye (I used black)

Directions
  1. Preheat oven to 350 degrees.
  2. Line cupcake tin with cupcake papers.
  3. Combine flour, sugar, and baking powder in large bowl. 
  4. Add butter, vanilla, and 1 cup milk. Beat at medium speed for about a minute. 
  5. Add eggs.   Beat at medium speed for about a minute, then at high speed for another minute.
  6. Separate batter into two batches - one larger batch for your vanilla, and a smaller batch to be turned into chocolate.
  7. In small saucepan over low heat, heat chocolate chips. When chocolate chips are hot but not burnt, turn off heat and add a splash or two of milk. Stir or whisk together well until chocolate is slightly creamy.
  8. Add chocolate to smaller batch of cake batter and stir well.
  9. Fill cupcake papers about half full with vanilla batter. To each, add a spoonful of chocolate batter and swirl together using a knife. Clean the knife before swirling the next cupcake.
  10. Bake at 350 degrees for 20-25 minutes.
  11. Let cool for 10-15 minutes on cooling rack.
  12. While cupcakes are cooling, combine flour and 1 cup milk in saucepan over medium heat. Whisk or stir constantly until very thick. (The recipe's author compares the desired thickness of this frosting to brownie batter.) Remove from heat and cool completely. Place pan in bowl of ice if you need it to cool more quickly.
  13. In a mixing bowl, combine sugar and butter. Beat until graininess of sugar is gone. 
  14. Add vanilla to flour/milk mixture, then pour into butter/sugar mixture. Beat on medium-high speed until texture resembles whipped cream.
  15. Frost cupcakes using white frosting. Add food dye to remainder of frosting in bowl until desired color is achieved. Scoop into icing bag with a small writing tip inside and decorate with boot design and your favorite facial hair configurations.


    More about the Contest

    Saturday, November 20, 2010

    Cream Cheese Stuffed JalapeƱos

    It can be easy to fall into a routine at Thanksgiving - turkey, stuffing, mashed potatoes, corn, rolls, pumpkin pie.. why not spice up your holiday? Yes, literally. Live on the edge! Consider these bad boys for a fun appetizer.

    I was browsing some of my favorite blogs and came across a stuffed jalapeƱo recipe on The Way the Cookie Crumbles. While her peppers were wrapped in prosciutto which gave them an added texture, I was hoping to focus on flavors. With the help of my awesome friend Jen, we did an experiment with several different flavor combinations and came up with the beauties you see here. I have always enjoyed cream cheese and jelly together and was glad to see it worked out in this form. We liked the combination of spicy, creamy, and sweet.

    Some of the intensity does get baked out of the peppers, but they are spicy to work with in their raw state. You can throw on a pair of rubber gloves while you're slicing and seeding to keep your hands protected.


    Ingredients
    (This recipe is listed as gluten-free since most cream cheeses are naturally gluten-free. However, please check the label if you are unsure.)
    • 8 jalapeƱo peppers, halved lengthwise and seeds removed
    • about 4 oz. cream cheese or NeufchĆ¢tel cheese (half package)
    • grape jelly
    Directions
    1. Preheat oven to 400 degrees.
    2. Place jalapeno halves on cookie sheet. Spread cream cheese into each the "cup" of each pepper.
    3. Bake at 400 degrees for 15-20 minutes, removing when cream cheese has browned.
    4. Top each with a small blob of jelly.
    5. Place on a nice tray to serve or eat hot off the cookie sheet.  :)

    Sunday, November 14, 2010

    AE Featured

    Artistic Eatables' Creamy Potato Soup was featured in the Acupuncture Studio's most recent e-mail newsletter. 

    The Acupuncture Studio, out of Glens Falls, NY, is a great place for those desiring massage, acupuncture, and other healing arts. If you're ever near the historic Troy Shirt Factory, check them out! ( /end shameless plug for one of my favorite places )

    Monday, November 8, 2010

    Roasted Vegetable Minestrone

    For weeks, I had been drooling over this soup recipe from What Megan's Making, one of my favorite food blogs. I loved the idea of roasting vegetables to bring out their flavor in an unexpected place like soup, and couldn't wait to give this a try as the weather has cooled off here. 

    To switch up the original recipe, I changed which vegetables to roast, catered the seasoning to my liking, and altered the amounts for a smaller crowd. This recipe will make enough for 3-4 people as a main dish.


    Ingredients for roasting vegetables
    • 1 bunch small carrots, sliced in rounds
    • 1 small zucchini, halved lengthwise and sliced
    • 1 yellow (summer) squash, halved lengthwise and sliced
    • 1/2 red onion, halved and sliced thinly
    • generous drizzle of olive oil
    • salt + pepper
    Ingredients for rest of soup
    • more olive oil
    • 2-3 cloves garlic, minced
    • 3 stalks celery, sliced
    • pinch of dried thyme leaves
    • 14.5 oz can cannellini beans, drained
    • 6 cups vegetable broth (more if you want it brothier)
    • 2 cups pasta shells, uncooked
    • 14.5 oz can diced tomatoes with juice
    • salt + pepper
    • fresh parsley or Parmesan or mozzarella cheese (garnish, optional)

    Directions
    1. Preheat oven to 500 degrees.
    2. Combine ingredients for roasting vegetables in large baking dish and cover. Bake at 500 degrees for 20-25 minutes. Remove from oven and set aside, still covered, until soup is complete (Step 8).
    3. While vegetables are roasting, heat olive oil in a large stockpot over medium-low heat. 
    4. Add garlic, celery, and thyme. Cook for about 5 minutes.
    5. Add cannelini beans and vegetable broth. Increase heat to medium-high until broth boils, then reduce to low. 
    6. Add pasta shells and cook until they are al dente (about 10 minutes).
    7. Add tomatoes and cook until heated throughout. 
    8. Pour roasted vegetables into soup and stir to incorporate.
    9. Season with salt and pepper, and top with desired garnish.

    Wednesday, November 3, 2010

    Cinnamon Chip Cookies

    First things first - the winner of my first blogiversary giveaway (a jar of homemade blackberry jam), who was chosen randomly, is Kate, who said about her favorite homemade item: "I love love love anything with peanut butter. I have kind of a problem with it. Hi, my name is Kate and I'm a peanut butterholic." Kate, I will be contacting you via e-mail for your info!

    On to the deliciousness...

    Cinnamon chips, unlike chocolate chips, don't really taste great on their own. But after baking in a hot oven and melting a little, they become one of my favorite additions to a cookie. They're more like cinnamon sugar really, and since they're so tiny they help create a cookie that much resembles snickerdoodles in flavor. I was able to find my bag of cinnamon chips at a local independent grocery store that sells bulk products. You may be able to find some at a food co-op or specialty baking store if they're not at your regular grocery store.

    The trick with these, and any cookie, is when you remove them from the oven. To get a crunchier cookie, wait until the edges of each cookie have just browned. For a chewier cookie, check on them as the minimum time gets close. Remove them as soon as they look firm, regardless of their color. They will continue to cook for another minute or two out of the oven until they cool completely.

    Recipe adapted from The Cookie Book by Nancy Baggett.

    Ingredients (makes 25-30 cookies)
    • 1 cup (2 sticks) salted butter, at room temperature (not melted)
    • 1/2 cup sugar
    • 3/4 cup brown sugar
    • 2 tsp vanilla
    • 2 eggs
    • 2 1/2 cup flour
    • 1 tsp baking soda
    • 3/4 lb cinnamon chips
    Directions
    1. Preheat oven to 375 degrees.
    2. In a large mixing bowl, combine butter, sugar, and brown sugar.
    3. Add vanilla and eggs.
    4. In a separate bowl, combine flour and baking soda.
    5. While stirring / mixing sugar mixture, slowly add flour mixture until completely incorporated.
    6. Add cinnamon chips and stir well.
    7. Grease two cookie sheets.
    8. Place dough balls the size of golf balls onto cookie sheet, spacing them about 2" apart.
    9. Bake, one tray at a time, at 375 degrees for 8-10 minutes.
    10. Remove from oven and place cookies on a cooling rack for at least five minutes.


    Wednesday, October 27, 2010

    Happy Blogiversary - and a Giveaway!

    Can you believe it's been one year of Artistic Eatables? I've been chopping, kneading, frying, baking, simmering, and photographing my food for you since October 27, 2009. 

    To celebrate, I am offering a giveaway - my first ever.   

    I will be awarding one lucky reader a jar of my homemade blackberry jam. (Ingredients: freshly picked blackberries, sugar, liquid pectin)


    photo from breadexperience.com


    To enter the giveaway, simply leave a comment with your name, a way to contact you, and tell me your favorite homemade item (canned, baked, whatever!).

    Sorry international readers, this prize can only be delivered to US residents.


    The comments will be open until Saturday October 30, 5pm. Cheers!

    Sunday, October 24, 2010

    Greek Calzones

    I love anything relating to bread, carbohydrates, or flour. Yum.  When my friend Lindsay sent me a link to this new twist on calzones (which are traditionally made with ricotta, mozzarella, and your choice of meat), I couldn't resist.

    To "Greek" it up, they've replaced the mozz with feta cheese, which is quite a bit saltier, but don't fear if you're not into what some would consider weird cheeses. The feta is just to give a little saltiness to the otherwise creamy filling of ricotta and spinach. If you don't like feta, consider some of the alternatives I've listed below in my Comments section. 

    I love the inclusion of spinach to this recipe, which is surprisingly nutritious but also adds a nice chewy texture that the cheese just can't cover on its own.

    Recipe altered slightly from the version on Delish.com

    Ingredients
    • olive oil for baking sheet
    • 1 batch pizza dough
    • 10 oz. box frozen spinach, thawed, drained, and patted dry
    • 15 oz. ricotta cheese
    • 3-6 oz. feta cheese, crumbled
    • pinch of dried dillweed
     Directions
    1. Preheat oven to 425 degrees.
    2. In a mixing bowl, combine spinach, ricotta, dill, and as much feta as desired.
    3. Split pizza dough into four even pieces. Flatten out into large circles.
    4. Spoon equal amounts of cheese mixture onto one half of each circle. Fold dough over and press to close. 
    5. Place each calzone on a raised-edge cookie sheet. Bake at 425 degrees for 20-25 minutes or until crust is golden.
    6. Let cool at least 5 minutes before eating. Serve with desired sides.


    Comments

    Even with patting the spinach dry, the filling was still quite wet, presumably from the ricotta. You may choose to cut a slit in the top of the calzone so the moisture can escape there; otherwise it might try to leak out the sides.

    We ate our calzones plain but I think I would have enjoyed them more with a side of marinara sauce, even though it wouldn't fit with the Greek theme.

    Next time I'd also like to try these with some different additions in the filling: perhaps chunks of artichoke hearts, chopped kalamata olives, or even diced sundried tomatoes. If you choose to add something salty, just reduce the feta a little bit to balance out the flavors.

      Friday, October 15, 2010

      AE Update 10/15/10

      As I get over a sinus infection and do a little traveling this weekend, I'll be away from my kitchen more than usual. Please excuse the blogging hiatus! I hope to come back with some delicious treats for you soon.

      Friday, October 8, 2010

      Fresh Tomato and Roasted Garlic Salsa

      Ingredients
      • 5-6 cloves garlic
      • olive oil
      • 2 small ripe tomatoes
      • 1 green tomato
      • 1 jalapeno pepper, seeded and diced
      • juice of 1/2 lime
      • salt and pepper to taste
      Directions
      1. Preheat oven to 450 degrees.
      2. Cut tips off the top of each garlic clove. Place in small baking dish and drizzle with olive oil. Bake at 450 degrees until garlic is roasted completely, about 20 minutes.
      3. While garlic is roasting, finely chop tomatoes and jalapeno pepper. Mix together in medium bowl.
      4. Squeeze each garlic out of its paper and onto a cutting board, mince and add to bowl.
      5. Add lime juice and season with salt and pepper to taste.

      Saturday, October 2, 2010

      Creamy Potato Soup

      This soup is SO. EASY. Thanks to a basket of vegetables from my friend Gretchen, I was blessed with gorgeous homegrown potatoes and onions. They've been staring me down the entire week, basically begging to be simmered and pureed. Now, I know that root vegetables talking to me makes me weird, but at least the weirdness comes with clear cut inspiration.

      The beauty of this soup, like my Creamy Broccoli Cauliflower Soup, is that the creaminess comes from pureeing some of the starchy vegetables, so if you're not into dairy you can omit it completely. I did add a splash of heavy cream at the end, but it was a smooth soup without it. As a small bowl, this would be a great appetizer course, or could also be served as a great vegetarian / vegan main course with a hunk of warm bread.

      If you have less time available to cook this, just be sure to cut your potatoes into smaller pieces; the increased surface area will help them cook more quickly.

      Ingredients (serves 3-4 main dish or 5-6 appetizer)
      for a vegan or dairy-free meal, replace butter with olive oil and omit heavy cream
      for gluten-free meal, be sure to use gluten-free vegetable stock
      • 1-2 Tbsp butter
      • 1 small onion, chopped into small pieces
      • 4 small-medium starchy potatoes, such as Russets, washed and chopped
      • 1/2 tsp dried thyme leaves
      • water
      • 3 Tbsp or 3 cubes vegetable bouillon
      • splash of heavy cream, garnish (could also use a sprig of parsley or oregano in its place)
      Directions
      1. Heat a stockpot over medium heat. Melt butter.
      2. Add onions and cook 5 minutes or so, until they become translucent.
      3. Add potatoes and thyme. 
      4. Pour in enough water to cover the potatoes. Stir in vegetable bouillon. 
      5. Turn heat to medium-high. Cook until liquid boils well, then turn heat down to medium-low and cook until potatoes are very soft. 
      6. Remove from heat. Puree using an immersion blender to your desired consistency, or transfer and puree in blender in small batches. Mine still had some small chunks of potato in it.)
      7. Dish into bowls. Garnish with a splash or swirl of heavy cream, or a sprig of fresh parsley or oregano if desired.

      Tuesday, September 21, 2010

      Real Food.

      I've been thinking a lot about my philosophies on food in the past few months. Having issues with low blood sugar, I have grown to see food as a fuel that is necessary for me to enjoy my life instead of viewing calories as bad. I want things to taste good because, why bother eating if you're not going to eat well? Being an artist has also made me want to eat things that are aesthetically pleasing.
      photo by HelenPalsson on Flickr

      I have realized that one of my life food goals is to make everything I eat from scratch, at least once. Think about all the things you buy prepackaged or premade. Often, it takes as little effort to make it from scratch, just a little extra time. I've found that most of the time things taste so much better that I don't go back to the prepackaged stuff.

      Things I've made from scratch, at least once:
      • pizza dough
      • soft pretzels
      • artisan breads, baguettes, rolls
      • blackberry jam, peach jam, strawberry jam, elderberry jelly
      • dill pickles, bread and butter pickles
      • applesauce
      • salsa
      • mustard
      • spice mix - Mexican
      • french fries, sweet potato fries
      • tomato sauce
      • smoothies - peanut butter + banana
      • naan (Indian flatbread)
      • granola bars
      • trail mix
      • cakes, cupcakes, pie crusts
      Things I'd like to make from scratch:
      • English muffins
      • bagels
      • macaroni, including ravioli and tortellini
      • sausage, bacon
      • chicken, beef, veggie stock
      • ice cream
      • mayonnaise
      • yogurt
      • cheese, especially mozzarella
      • wine, beer, limoncello
      • honey (with Uncle J)
      • marshmallows
      Are there other things that should be on this list?

      Monday, September 13, 2010

      Mushroom, Olive, and Caramelized Onion Pizza

      Sometimes we go back to basics. It is cool out; I want the house to be warm with the smell of bread baking and cheese melting. I love using pizza as an excuse to clean out the fridge and finding new combinations of flavors. 

      For a long time I didn't like olives at all; now I know that I prefer those that don't come out of a can. Kalamatas are known for their strong salty flavor and beautiful deep purple color. How can you resist purple?

      This pizza features the salty and sweet combo. By caramelizing the onions, they cook down and marinate in their own sugars, browning and sweetening up perfectly. I added mushrooms but feel free to add whatever you've got handy; ham might taste good on this too.

      Ingredients (makes 1 pizza)
      • 1 batch pizza dough
      • 1/2 onion, halved and sliced
      • 1/2 package white mushrooms, sliced
      • about a dozen kalamata olives, pitted and chopped
      • cornmeal for sprinkling the pizza stone/pan
      • pizza sauce or spicy marinara sauce
      • 2-4 cups mozzarella cheese, shredded
      • parmesan cheese (freshly grated if possible)
      Directions
      1. Prepare pizza dough about 2 hours ahead of when you'd like the pizza to go in the oven. Be sure to allow it to rise in a draft free location. If your house is cold, warm the dough bowl.
      2. Caramelize onions over medium-low heat. (Cover them, and add a splash of water if you need more steam. Other than that, leave them alone, stirring occasionally. You will see them become translucent, then eventually brown as they cook in their own sugars.)
      3. About 15-20 minutes before baking time, preheat oven to 450 degrees. (If you're using a pizza stone, this should preheat too.)
      4. When oven is preheated and onions are caramelized, remove pizza stone from oven. Sprinkle stone liberally with cornmeal to prevent sticking. Stretch dough onto stone. Top with sauce, mozzarella, mushrooms, olives, and onions. Sprinkle with a generous amount of parmesan cheese.
      5. Bake at 450 degrees for 12-15 minutes, until crust is golden.

      Monday, September 6, 2010

      Gavin's Chocolate Cake

      All the boys in Dan the Man's family love chocolate cake, but there's one catch - no frosting can be involved. They'll eat it plain, or even with chocolate pudding on the side but don't want anything to do with overly sugary stuff. I originally developed this recipe for Dan's brother Gavin because, if you're going to eat plain cake, why not eat the best? 

      The recipe involves making your own cake flour (you'll see that in the strange measurement for flour, and the addition of cornstarch). If you have cake flour handy, just ignore the flour / cornstarch in the recipe, and use 3 cups of cake flour. You'll also want to have toothpicks on hand to check for doneness so you don't burn this delicious treat.

      Lastly, if you've never baked with baking chocolate, be sure to get the right kind. You'll be sorry if you accidentally use unsweetened instead of the semisweet baking chocolate called for by the recipe...not that I've ever done that before. Additionally, you can substitute semisweet chocolate chips if you've got those on hand - according to the substitutions on this website, sub in a little over 1/2 cup semisweet chocolate chips for the 3 1/2 oz. semisweet baking chocolate required in my recipe.
      five 1/2 oz squares of semisweet Baker's baking chocolate


      Ingredients
      • 3 1/2 oz. semi-sweet baking chocolate
      • 3/4 cup salted butter (equal to 1 1/2 sticks, or 12 Tbsp)
      • 2 1/2 cups + 2 Tbsp all-purpose flour (unbleached is best)
      • 6 Tbsp cornstarch
      • 1 1/2 tsp baking soda
      • 2 cups sugar
      • 1 tsp vanilla
      • 2 eggs
      • 1 1/2 cups cold water
      Directions
      1. Preheat oven to 350 degrees.
      2. Grease 9 x 13 cake pan. Set aside.
      3. In small saucepan, melt butter and chocolate together over medium-low heat. Let cool.
      4. In medium bowl, mix together flour, cornstarch, and baking soda. Set aside.
      5. Pour sugar into large mixing bowl. With electric or stand mixer with whisk attachment at medium speed, pour in chocolate/butter mixture and mix for about 1 minute.
      6. With mixer still on medium, add vanilla, then both eggs (one at a time). 
      7. Then add flour mixture gradually, alternating with cold water. Scrape down sides of bowl and continue to beat for another minute or two, until batter is fluffy.
      8. Pour batter into greased 9 x 13 pan. 
      9. Bake at 350 degrees for 30-35 minutes. Check for doneness using toothpick.
      10. Let cake cool at least 15-20 minutes. Serve alongside chocolate pudding, whipped cream, or any other sidekicks you might enjoy.

      Sunday, August 29, 2010

      Wild Mushroom Soup

      I've photographed a moon crater!

      Not really, but I did win the mushroom lottery.

      This week, I was gifted with delicious wild edible mushrooms. The most interesting one was the giant puffball. It was the size of a volleyball, and from reports I've received, that is a "normal" size puffball.

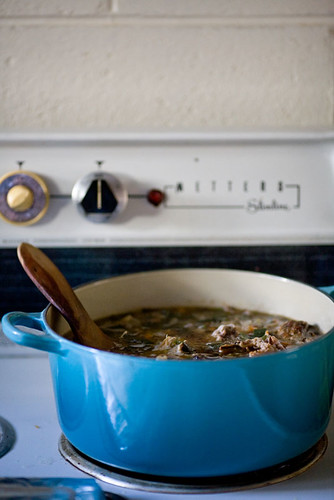
      What do you do with an enormous puffball and approximately one-and-a-half quarts of beautiful wild, flavorful mushrooms? Make soup!

      I developed this recipe to work with mushrooms from the grocery store if you don't have a mushroom fairy-godmother like I do. For the puffball, you'll want white, starchy mushrooms like button mushrooms, although you'll probably need to trim the stems. For wild mushrooms I suggested porcini mushrooms but any tan mushrooms will work, even baby bellas.

      By using the mushroom puree to thicken, this recipe stays pretty healthy, but more importantly has a prominent but not overbearing mushroom flavor. The fresher the mushrooms, the better this soup will taste. And by fresher, I mean as close to home as possible. Regardless of the source of your mushrooms, be sure to wash them well before cooking.


      Ingredients (serves 4)
      for a vegetarian recipe, be sure to use vegetable stock instead of beef stock.
      for a vegan recipe, use vegetable stock and replace the butter with olive oil.
      for a gluten-free recipe, use gluten free stock.
      • 6 Tbsp butter (divided use)
      • 1/2 medium immature giant puffball, chopped, or 2 packages white mushrooms, sliced
      • 1 lb or so wild mushrooms, sliced, or porcini mushrooms, sliced
      • 5 cups beef or veggie stock (divided use)
      • 1 small onion, diced
      • 1 clove garlic, minced
      • 1 tsp dried thyme (use less if ground thyme)


      Directions
      1. Melt 3 Tbsp butter in a large stockpot over medium heat.
      2. Add puffball / white mushrooms and stir.
      3. When mushrooms are browned, add 1 cup of the stock.
      4. Simmer over low heat 5-10 minutes.
      5. Pour into a separate mixing bowl and puree using an immersion blender. The mixture will be somewhat thick.
      6. Return saucepan to medium heat. Melt remaining 3 Tbsp butter.
      7. Add onion, garlic, and thyme. Saute until onion is translucent.
      8. Add wild / porcini mushrooms. Stir well and cook for about 5 minutes.
      9. Add remaining 4 cups of stock and cook until liquid begins to bubble, about 4-5 minutes.
      10. Turn heat to low. Stir mushroom puree into soup and cook for another minute.
      11. Serve with bread or rolls.
      Comments
      If you make this recipe vegan (replacing the butter with olive oil), you may need to season with salt and pepper. However, with beef stock it was perfectly seasoned for us.

      The soup was light but fairly filling. We had it for lunch with some rolls and everyone seemed satiated. I was pleased that because of the lack of cream or milk, the mushroom flavor stood out. After all, why eat mushroom soup that doesn't taste like mushrooms?

      Saturday, August 21, 2010

      Honey Banana Bread

      One of my friends has an allergy to cane sugar, prompting me to develop a dessert recipe that didn't heavily rely on sweetness for its flavor. No cane sugar means no granulated sugar, no brown sugar, and no molasses. Sure, there are artificial sweeteners like Splenda, which contains xylitol, or natural ones like agave nectar. I wanted a sweetener that was natural but also probably already in people's pantries. 

      Honey has a lower glycemic index than sugar, which is good for those concerned with high blood sugar. If you buy local honey, you are also ingesting nectar from the plants and flowers in your region, thus helping your body to be less sensitive to allergens. (Just be careful to buy real, unprocessed honey and not a product diluted with other ingredients. Check out this article for more information.)

      Ingredients
      • 6 Tbsp butter (3/4 stick), softened but not melted
      • 3 bananas, very ripe, mashed
      • 1/2 cup honey
      • 1/2 tsp vanilla
      • 1 egg
      • 2 cups flour
      • 1 tsp baking soda
      • 1 tsp baking powder
      Directions
      1. Preheat oven to 350 degrees.
      2. In large mixing bowl, mix together butter and bananas with electric or stand mixer (medium or speed #4 using whisk attachment). 
      3. With mixer on, pour in honey, vanilla, and egg. Mix for about 1 minute.
      4. Add flour, baking soda, and baking powder. Mix for another 1-2 minutes, until batter looks smooth and creamy.
      5. Bake at 350 degrees for 55-60 minutes.
      6. Let cool on cooling rack for 10 minutes, then remove bread from pan and let cool for another 30 minutes before cutting.

      Comments
      Baking with honey was pretty easy. It required reducing the amount of liquid in the other ingredients (i.e. using fewer eggs and less vanilla) and using significantly less honey than was required for the amount of sugar in my original recipe. 

      The color of the bread was what most impressed me at first. It came out of the oven a beautiful golden brown color, with a smooth crust.

      As for the flavor, I really couldn't tell that there was anything different about it - the banana flavor was pronounced but not overbearing, just the way I like banana bread. Tasted great without butter but would be great with it. Even with the reduction in liquid, the amount in the honey made up the difference so the bread was the perfect texture.

      Wednesday, August 18, 2010

      Cooked Tomato Salsa

      This is the second part of my mini-series on using fresh tomatoes before they go bad. I was reading one of my favorite food blogs, La Fuji Mama, and one of her recent posts was what she calls "Tomato Salsa #95". Depending on the ripeness and type of the tomatoes, the strength of the onion, and the other additions you include, the amount of seasonings will be quite flexible. You'll see that with the recipe below: I started with La Fuji Mama's recipe as a base, then altered it to create a salsa that was spicy enough for my liking.

      Cinnamon and cloves were quite a surprise to me when I read the ingredient list, as well as the lack of any type of hot peppers, jalapeno or otherwise. My directions reflect my test of a close match to the original recipe, then additions for spicing it up a little.

      See the comments below about seasoning with the green and regular Tabasco sauces.

      Ingredients (makes 2-3 cups)
      Directions
      1. Heat olive oil in large skillet over medium heat.
      2. Add tomatoes and onion. Cook until tomatoes begin to change color and liquid bubbles, about 5-7 minutes.
      3. Quickly drain tomato mixture in mesh strainer, then pour into food processor bowl. There will be some juices left.
      4. Add lime juice, vinegar, salt, oregano, cinnamon, and cloves. 
      5. Process using the Pulse button, very quickly, just long enough to chop tomatoes into smaller pieces. (This should take no more than 3 seconds.)
      6. Put entire mixture in Tupperware or other container, and place in fridge for at least one hour.
      7. Once salsa is cold, season using green and red Tabasco sauces. (I did 15-20 drops of green Tabasco, and around 10 drops regular Tabasco sauce.)
      Comments
      I found it necessary to drain the liquid from the tomatoes before processing them, and was glad I did. The final salsa was still watery but draining improved the consistency a lot.

      Judging spiciness was difficult to when the salsa was still hot; all I could taste was the warm tomato flavor. After refrigerating it, it was a million times easier to see what flavors were needed. Green Tabasco sauce is a bit milder than the red, but still has a nice bite to it, so we seasoned with that first. The regular (red) Tabasco sauce was added at the end for that "bite" for which it is known.

      I was also pleased that the cinnamon and cloves were successful in the final product. I could taste them but they also helped the spiciness of the Tabasco to stand out more.

      Saturday, August 14, 2010

      Pesto Pasta with Roasted Tomatoes and Garlic

      What do you do with a bunch of big, beautiful tomatoes that are given to you, before they take over your kitchen?

      This is the first of two recipes working to solve that "problem". I roasted chunks of tomatoes and minced garlic right in my cast iron frying pan, allowing the whole mixture and pan to heat up as the oven did. Everything timed out perfectly so the tomatoes were done roasting at the exact moment when they were needed for the pasta. It's an easy recipe that has a lot of flavor, since roasting vegetables is the best way to bring out their best qualities.

      Ingredients
      • olive oil
      • 2 large tomatoes, cut into chunks
      • 2 cloves garlic, minced
      • 1 lb cut pasta (such as penne or ziti)
      • 3-4 spoonfuls basil pesto, or more to taste (I like Classico's pesto)
      Directions
      1. Turn on oven to 425 degrees.
      2. Drizzle olive oil in an oven-safe dish or pan. Add chopped tomatoes and garlic, stir quickly to coat, then place in oven while oven is still preheating.
      3. While tomatoes are roasting, boil water and prepare pasta according to package directions.
      4. Drain and rinse pasta; return to pan.
      5. Add pesto to your desired taste.
      6. Remove tomatoes from oven. Add to pasta and serve immediately alongside a chunk of crusty bread.

      Tuesday, August 10, 2010

      Borscht. Yes, Really.

      One of my 2010 food goals was to make borscht, if for no other reason than to say that I tried it. I'm not a big fan of cold soups, so I was very excited to find that there are many different ways to serve borscht. In many cultures, borscht is served cold like gazpacho but it is just as often served hot. In the same fashion, some recipes recommend pureeing the vegetables so the soup is a creamy consistency, while others want the vegetables left chunky. 

      The recipe offered below is a chunky soup, served hot. The potatoes are cut into small, bite-sized pieces for ease in both cooking and eating. The beets and onion are shredded, so a food processor's shredder attachment will make your life easier for that step. No matter what type of vegetables you add, they'll all be stained purple by the end for a very unique dish. Also, the lemon juice is necessary to create the acidic or sour taste that is essential to the overall flavor of the dish.

      Based on a recipe from Mark Bittman's How to Cook Everything.


      Ingredients
      (for gluten-free meal, use gluten-free broth)
      (for vegan or dairy-free meal, omit sour cream) 
      • olive oil
      • 1 clove garlic, minced
      • 3-4 potatoes, chopped into small pieces (regular or sweet potatoes)
      • 6 cups vegetable broth (or chicken broth)
      • 1 bunch beets (6 or so), peeled and greens removed
      • 1/2 red onion
      • 1 tsp kosher salt (less if using table salt) 
      • 10 grinds freshly ground pepper (about 1 tsp)
      • juice of 1 lemon
      • 1 tsp. dried dill
      • 1 egg
      • sour cream, for garnish (optional)
      Directions
      1. Heat olive oil over medium heat. 
      2. Add garlic and potatoes. Cook for about a minute.
      3. Add broth. Increase heat to high and bring soup to a boil, then turn heat back to medium-low. Cook for about 7-8 minutes.
      4. While potatoes are cooking, shred beets and onion in food processor. Add to soup when ready.
      5. Add salt and pepper to taste. Cook on medium low until all vegetables are tender.
      6. Add lemon juice.
      7. Scramble egg in small bowl. Add spoonful of soup to egg, stir well, then drizzle back into pot of soup while stirring. 
      8. Serve immediately with sour cream if desired.

      Thursday, August 5, 2010

      Summer Salad with Kentucky Dressing

      Sometimes I go to the farmers' market and want to buy everything there! There are many fruits and vegetables that have so much potential. I stopped at both a farm stand and a market yesterday, and one of the many things I ended up with was a pint of locally grown strawberries. They were so tiny and sweet that I wanted to find a way of using them that brought out their flavor, rather than hiding it.

      This is a simple salad with an easy homemade dressing. Kentucky dressing is from the Gardeners' Community Cookbook, one of the cookbooks on my wishlist. 

      Ingredients

      (Salad)
      • leaf lettuce, chopped, or baby spinach
      • fresh berries (strawberries should be sliced into bite-sized pieces)
      • any other vegetables you'd like (I added baby bella mushrooms)
      (Dressing)
      • 1/4 cup apple cider vinegar
      • 1/4 cup olive oil
      • 1/4 - 1/2 cup sugar
      • 1-2 Tbsp sesame seeds
      • 1 Tbsp poppy seeds
      • dash Worcestershire sauce (optional)
      Directions
      1.  Prepare salad as desired.
      2. In a small bowl with spout or liquid measuring cup, measure out vinegar. While whisking, add in olive oil, sugar to taste, sesame seeds, poppy seeds, and Worcestershire sauce if using.
      3. Drizzle desired amount of dressing over salad. Enjoy!

      Comments
      I've made this dressing several times and it is a little different every time. This time I was a little heavy-handed with the vinegar, creating a more sour dressing. Adding more sugar allows you to control the sweetness. In general, the dressing brings out the strawberries' sweetness. I've also enjoyed this salad with a combination of strawberries and blueberries.